Cross-platform inference using fast.ai models
After training a model using fast.ai, you can use it on some other platform to make inferences (that is, get predictions on new data). However, using a model trained on one platform on another platform can be a bit of a hassle.
learn.export is a bad choice for this use case, since the file which is exported by this method can only safely be used on the same OS, with the same Python version, and the same PyTorch version. So even if you manage to load such a file on Windows, chances are that it will break during the next software update.
In this post I'll explain how to take a fast.ai trained image classifier, and put it in a .NET Core application for inference use. This application will work on any platform (well, Windows, Linux, and Mac), and willl not require a GPU to do its inference. Nothing about this is specific to image classification, any architecture and use case should work.
To do this, we'll use the ONNX file format to store the model, and the ONNX Runtime to use it for inference. ONNX Runtime is written in C++ and can be used from most programming languages and platforms, not just .NET. Check out its homepage for more details.
The post is made up of two parts:
- Training a fast.ai model and exporting it to ONNX
- Building a .NET Core application which uses that model for inference
The full code and model for this entire project (Python part + .NET part) is available here: https://gitlab.com/raphaelr/fastai-onnx-dotnet.
Training a fast.ai model and exporting it to ONNX
You should be able to export most PyTorch/fast.ai models to ONNX. For this example, we'll train a pet breed classifier on the Oxford-IIIT Pet dataset. You can use any model you want (or even just use load_learner to load an already trained model from a .pkl file).
from fastai.vision.all import *
path = untar_data(URLs.PETS)
pets = DataBlock(
    blocks=(ImageBlock, CategoryBlock),
    get_items=get_image_files,
    get_y=using_attr(RegexLabeller(r'(.*)_\d+'), 'name'),
    item_tfms=Resize(460),
    batch_tfms=aug_transforms(size=224, min_scale=0.75)
)
dls = pets.dataloaders(path/'images')
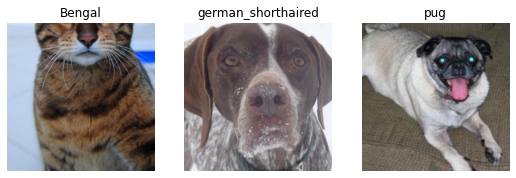
dls.show_batch(max_n=3)
learn = cnn_learner(dls, resnet18, metrics=error_rate)
learn.fine_tune(3)
| epoch | train_loss | valid_loss | error_rate | time |
|---|---|---|---|---|
| 0 | 1.661514 | 0.399254 | 0.130582 | 00:43 |
| epoch | train_loss | valid_loss | error_rate | time |
|---|---|---|---|---|
| 0 | 0.553360 | 0.318793 | 0.106225 | 00:52 |
| 1 | 0.403018 | 0.286076 | 0.091340 | 00:52 |
| 2 | 0.285408 | 0.249290 | 0.073748 | 00:52 |
Thinking about the model's inputs and outputs
When you export a model to ONNX and load it in another ML framework, you need to be aware of which data a model requires, and which data it outputs. In other words, you need to know which inputs to feed it and how to interpret its outputs. You can inspect learn.model to look at the first and last layer:
learn.model
Sequential(
  (0): Sequential(
    (0): Conv2d(3, 64, kernel_size=(7, 7), stride=(2, 2), padding=(3, 3),
    ...snip...
    (8): Linear(in_features=512, out_features=37, bias=False)
  )
)
This model starts with a Conv2d layer, which accepts any image size as long as it has 3 (color) channels.
And the model ends with a Linear layer, which outputs one activation per image class. Since there are 37 breeds in this dataset, there are 37 output activations. In particular, note that there is no Softmax layer at the end.
How your application has to use this model
Based on this information, your application must:
- Feed a 3-color-channel image into the model
- Process 37 output activations, where each activation corresponds to a pet breed. The higher the activation, the more confident the model is that the image is of that activation's class.
- If your application needs to generate a probability for each class, then it has to perform the softmax operation (or something similar) itself.
Footnote: You could add a Softmax layer yourself at the end now (= after training), but for this example I'll leave it up to the application to interpret the model's outputs.
Exporting the model to ONNX
Use torch.onnx.export to export a PyTorch model to ONNX. Since fast.ai models are PyTorch models, this works just fine.
The method has a few parameters, but five of them are very important:
model: The model you want to export.args: One or more tensors which represent the input of your model. This requires some explaination. The content of the tensor does not matter, but it needs to have the correct shape. In particular, the first axis must be the batch size, even if it is 1. Your application will probably ask for a prediction one image at a time, so we'll select 1 as the batch size. And we'll feed the model with 224x224 pixel images, with the aforementioned 3 color channels. Putting it all together, we'll supply a single tensor of shape (1, 3, 224, 224). And your application must feed a tensor of that exact shape into the model.f: Name of the file which should be written by the exporter. Can also be a file-like object.input_names: Names of the model's inputs. This can be anything you like. Your application has to use these same names to access the model's input.output_names: Names of the model's outputs. Same deal as withinput_names.
If you trained the model on the GPU (as you probably did), you have to make sure the tensors you pass are also on the GPU (what the .cuda() call does), otherwise PyTorch will complain.
torch.onnx.export(
    learn.model,
    torch.randn(1, 3, 224, 224).cuda(),
    "pet-breed.onnx",
    input_names=["image"],
    output_names=["breeds"]
)
Exporting the vocabulary
Since we're doing image classification here, it would certainly help to also export the names of the classes the model is predicting. Otherwise your application will know that class #33 had the highest activation, but it wouldn't know what class #33 is.
You can access the class names using the DataLoader's vocab. I'll choose the simplest possible export format here: A text file with one class per line, in the same order as the model's output activations:
with open("pet-breed.vocab.txt", "w") as f:
    f.write("\n".join(list(learn.dls.vocab)))
Downloading the model
You'll now have two files next to your notebook:
- pet-breed.onnx
- pet-breed.vocab.txt
You'll need to download them both and copy them to your application.
Building a .NET Core application which uses that model for inference
Again, I want to stress that nothing about this is specific to .NET Core, it's just the example target platform I use. If ONNX Runtime does not support your target platform, you should try searching on the internet for alternative ONNX libraries.
Setting up the project
Install the .NET Core SDK for your development environment if you haven't already. Then create a new console project.
$ mkdir PetBreedClassifier
$ cd PetBreedClassifier
$ dotnet new console
We'll need two dependencies to build this project: SkiaSharp for loading and processing images (we're building an image classifier after all), and ONNX Runtime for loading and running the model. Let's install both:
$ dotnet add package SkiaSharp
$ dotnet add package Microsoft.ML.OnnXRuntime

If you want to run the application on Linux also install:
$ dotnet add package SkiaSharp.NativeAssets.Linux
Let's get to coding. Our application will be very simple for demonstration: It will accept a path to an image via the command line, and output each breed and its predicted probability. Of course, everything here works just as well in a GUI program or a web application.
Open Program.cs and add a basic skeleton for our task:
using System;
using System.IO;
using System.Linq;
using System.Runtime.InteropServices;
using SkiaSharp;
using Microsoft.ML.OnnxRuntime;
using Microsoft.ML.OnnxRuntime.Tensors;

namespace PetBreedClassifier {
    class Program {
        static int Main(string[] args) {
            if (args.Length < 1 || !File.Exists(args[0])) {
                Console.WriteLine("Usage: ./PetBreedClassifier path-to-image.jpg");
                return 1;
            }

            // Inference goes here
            return 0;
        }
    }
}
Loading the image
This application has two basic steps: Loading an image and running the model. Let's load the image first.
This is actually the harder step! Unlike in python, we can't just say tensor(PILImage.open(args[0])) and be done with it...
To load the image we need to:
- Load it from disk
- Resize it to 224x224 Pixels (remember, this is the size we specified in
torch.onnx.export) - Get the raw pixel data
- Transform the pixel data: change the order of pixels from
row, column, channel(this is what SkiaSharp gives us) tochannel, row, column(this is what our model expects), and convert them from bytes (0-255) to floats (0.0-1.0)
So, let's tackle each step one by one. Replace the // Inference goes here comment with the following code:
Load the image from disk
This is straightforward.
using var originalImage = SKImage.FromEncodedData(args[0]);Resize it to 224x244 pixels
We have to create a SKSurface (basically, an Image we can draw on, not just read) with the desired size and draw the originalImage onto it:
const int desiredWidth = 224, desiredHeight = 224;
var imageInfo = new SKImageInfo(desiredWidth, desiredHeight, SKColorType.Rgba8888);

using var resizedSurface = SKSurface.Create(imageInfo);
using var paint = new SKPaint { FilterQuality = SKFilterQuality.High };
resizedSurface.Canvas.DrawImage(originalImage, imageInfo.Rect, paint);
Get the raw pixel data
We have to use some nasty low-level .NET methods to get access to the raw pixels.
var bytes = new byte[imageInfo.BytesSize];
var pixelBuffer = IntPtr.Zero;
try {
	pixelBuffer = Marshal.AllocHGlobal(imageInfo.BytesSize);
	resizedSurface.ReadPixels(imageInfo, pixelBuffer, imageInfo.RowBytes, 0, 0);
	Marshal.Copy(pixelBuffer, bytes, 0, imageInfo.BytesSize);
} finally {
	Marshal.FreeHGlobal(pixelBuffer);
}
bytes is now a 224x224x4 array of pixels. There's an extra alpha channel there which we'll need to strip.
Transform the pixel data
We'll need to do two things here:
- change the order of pixels from
row, column, channel(this is what SkiaSharp gives us) tochannel, row, column(this is what our model expects) - Convert them from bytes (0-255) to floats (0.0-1.0)
Also, SkiaSharp gave us 4 channels (red, green, blue, alpha), and we need to drop the alpha channel here. That's just details at this point though...
var floats = new float[3 * desiredWidth * desiredHeight];
// Loop over every pixel
for (var y = 0; y < desiredHeight; y++) {
    for (var x = 0; x < desiredWidth; x++) {
        for (var channel = 0; channel < 3; channel++) {
This is already getting quite silly. Now the actual code we have to execute for each pixel.
var destIndex = channel * desiredHeight * desiredWidth + y * desiredWidth + x;
var sourceIndex = y * imageInfo.RowBytes + x * imageInfo.BytesPerPixel + channel;
Now that we have calculated both the destination index (remember, channel, row, column) and the source index (row, column, channel) we can read from one index, convert to float, and store to the other index:
floats[destIndex] = bytes[sourceIndex] / 255.0f;And close the loops:
        }
    }
}
We now have an array of floats in the correct order. Time to load our model!
Running the model
var modelDirectory = Directory.GetCurrentDirectory();
using var model = new InferenceSession(Path.Combine(modelDirectory, "pet-breed.onnx"));
var classNames = File.ReadAllLines(Path.Combine(modelDirectory, "pet-breed.vocab.txt"));
That's fairly simple. You can change modelDirectory if needed. Let's run the model we just loaded:
// Create the input tensor. This has to be the exact same shape
// you specified during torch.onnx.export, i.e. (1, 3, 224, 224)
var imageAsTensor = floats.ToTensor()
	.Reshape(new[] { 1, 3, desiredWidth, desiredHeight });

var modelInputs = new[] {
    // Use the same name you specified during torch.onnx.export, i.e. "image"
    NamedOnnxValue.CreateFromTensor("image", imageAsTensor),
};

// Action!
var modelOutputs = model.Run(modelInputs);
var activations = modelOutputs.Single().AsTensor<float>();
If you're used to PyTorch tensors you'll be quite disappointed in what this tensor class can do... But it's enough for our use. We can treat it as an array of length 37 - one element for each class.
Finally, we're going to output the activation and name for each class.
for (var i = 0; i < activations.Length; i++) {
    float activation = activations.GetValue(i);
    string className = classNames[i];
    Console.WriteLine($"{className}: {activation:F4}");
}
Computing the softmax probability too requires a bit more effort. Use this code instead if you want to do that:
// Pass 1: Compute activations.exp().sum()
var expSum = activations.Select(x => Math.Exp(x)).Sum();

// Pass 2: As the loop in the previous code snippet, but with probabilities:
for (var i = 0; i < activations.Length; i++) {
    float activation = activations.GetValue(i);
    var probability = Math.Exp(activation) / expSum;
    string className = classNames[i];
    Console.WriteLine($"{className}: {probability:P2}");
}
And that's a wrap
If you run this program you should see something like this:
$ dotnet run 1280px-Egyptian_Mau_Bronze.jpg

Abyssinian: 0.00%
Bengal: 0.07%
Birman: 0.00%
Bombay: 0.00%
British_Shorthair: 0.00%
Egyptian_Mau: 99.92%
Maine_Coon: 0.00%
Persian: 0.00%
...snip...
Note: The image I used is this one. Refactoring the code is left as an exercise to the reader.